What is a Vernier Caliper?
Vernier Caliper is a precise measuring instrument by which precision measurements of length, thickness, depth and inside or outside diameters can be obtained quickly.
Construction of Vernier Caliper
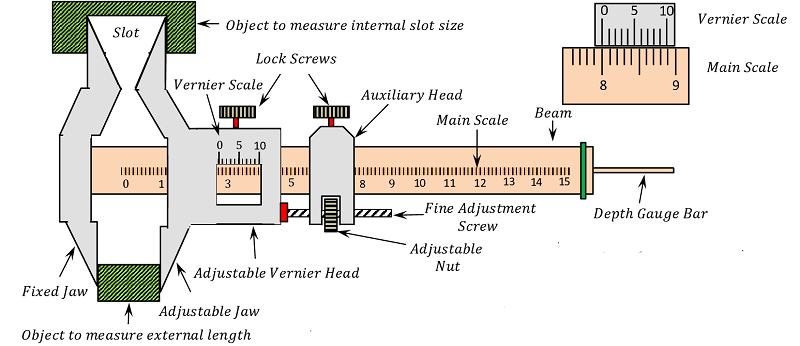
A Vernier Caliper consists of the following parts –
- Beam.
- Fixed Jaw.
- Adjustable Jaw.
- Adjustable Vernier Head.
- Auxiliary Head.
- Fine Adjusting Screw and Nut.
- Lock Screws.
- Depth Gauge Bar.
The construction features of a Vernier Caliper is shown in figure below.
Beam
It is rectangular, polished and hardened steel bar which carries the Main scale graduations. Fixed Jaw of the Vernier is firmly attached at one end of this bar.
Fixed Jaw
It is the fixed jaw of the vernier which is firmly attached at one end of beam which remain in contact with one side of the measuring object.
Adjustable Jaw
Adjustable Jaw is connected with the Adjustable Vernier Head which carries Vernier scale and smoothly slide over the beam. For taking measurements, the object is placed in between the Fixed Jaw and Adjustable Jaw.
Adjustable Vernier Head
It is firmly attached with the Adjustable Jaw and contains the Vernier scale. It slides over the beam for taking reading of measurements.
Auxiliary Head
The Vernier Caliper is also provided with an Auxiliary Head connected to the Adjustable Vernier Head by means of a Fine Adjustment Screw and Nut.
Fine Adjustment Screw & Nut
Auxiliary Head is connected to the Adjustable Vernier Head by means of a Fine Adjustment Screw and Nut.
It is used for fine adjustment of Adjustable Head during measurement so that the Jaw not pressed hard to the measuring object which may result errors in reading.

Lock Screws
Auxiliary Head and the Adjustable Vernier Head, both are provided with Lock Screws for locking them with the main scale at any desired position.
Depth Gauge Bar
Sometimes a Vernier Caliper is fitted with a Depth Gauge Bar to measure the depth of a hole. It is a thin rectangular rod firmly attached with the Adjustable Head and slides in a slot made at the backside of Beam.
All parts of a Vernier Caliper are made of good quality steel and the measuring faces are hardened properly.
Vernier Constant
Vernier Constant is defined as the difference in values of 1 division in Main scale and 1 division in Vernier scale.
Metric Vernier ( VC – 0.1 mm )
The simplest type of Vernier Caliper has Vernier Constant of ( 0.1 \ mm. )
In this instrument –
- The value of 1 smallest division in Main scale is 1 \ mm .
- Vernier Scale contains 10 equal divisions which coincides with 9 divisions of the Main scale as shown in figure.
- So, 1 division of Vernier scale is equal to \left ( \frac {9}{10} \right ) = 0.9 \ mm .
The difference in value of 1 division in Main scale and 1 division in Vernier scale is ( 1 - 0.9 ) = 0.1 \ mm . Therefore, Vernier Constant of this instrument is ( 0.1 \ mm ) .
Metric Vernier ( VC – 0.02 mm )
In this instrument –
- 1 \ cm of the Main scale is divided into 10 equal divisions. So, the value of 1 small division of the Main scale is 1 \ mm .
- This is again divided into 2 equal divisions. So, the value of each smallest division of the Main scale is 0.5 \ mm .
- The Vernier scale contains 25 divisions. Every fifth division is numbered.
- Now 25 divisions on the Vernier scale coincide with 24 smallest divisions on the main scale.
- So, the value of 24 smallest divisions of the Main scale = 24 \times 0.5 = 12 \ mm .
- Hence, the value of 25 divisions on the Vernier scale is 12 \ mm .
- So, 1 division on the Vernier scale = \left ( \frac {12}{25} \right ) = 0.48 \ mm .
The difference in value of 1 division in Main scale and 1 division in Vernier scale is ( 0.5 - 0.48 ) = 0.02 \ mm . Therefore, Vernier Constant of this instrument is ( 0.02 \ mm ) .
Metric Vernier ( VC – 0.05 mm )
In this instrument –
- 1 smallest division in Main scale is 1 \ mm .
- Vernier Scale contains 20 divisions which coincides with 19 divisions of Main scale.
- So, 1 division of Vernier scale \left ( \frac {19}{20} \right ) = 0.95 \ mm .
The difference in value of 1 division in Main scale and 1 division in Vernier scale is ( 1 - 0.95 ) = 0.05 \ mm . Therefore, Vernier Constant of this instrument is ( 0.05 \ mm ) .
English Vernier ( VC – 0.001 inch )
In this instrument –
- 1 large division in main scale is 1 inch. It has 10 equal divisions
- So, the value of 1 small division in main scale is 0.1 inch.
- Each small division in main scale is sub-divided into 4 equal divisions.
- So, the value of 1 smallest Main scale division will be \left ( \frac {0.1}{4} \right ) = 0.025 inch.
- Vernier Scale contains 25 divisions which coincides with 24 smallest divisions of Main scale.
- So, the value of 1 division of Vernier scale will be \left ( \frac {24 \times 0.025}{25} \right ) = 0.024 inch.
The difference in value of 1 division in Main scale and 1 division in Vernier scale is ( 0.025 - 0.024 ) = 0.001 inch. Therefore, Vernier Constant of this instrument is ( 0.001 ) inch.
Reading of Vernier
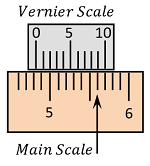
Let the reading obtained in measuring outside diameter of a rod is shown in figure.
READING – 1

From the reading of the measurement as shown in figure, we have following conclusions.
- ( 1 \ cm. ) of Main scale has 10 divisions.
- 9 divisions of Main scale coincides with 10 divisions of Vernier scale.
- So, Vernier Constant of the instrument is ( 0.1 \ mm. ) .
- Number of small divisions of the Main scale through which the zero of the Vernier has moved from the zero of the Main scale is 80
- Thus value of Main scale reading is ( 80 \times 1 ) = 80 \ mm .
- Sixth division of the Vernier has coincided with a certain division of the Main scale.
Therefore, outside diameter of the job will be ( 80 + 6 \times VC ) = ( 80 + 6 \times 0.1 ) = 80.6 \ mm
READING – 2
From the reading of the measurement as shown in figure, we have following conclusions.

- ( 1 \ cm. ) of Main scale has 10 divisions.
- 9 divisions of Main scale coincides with 10 divisions of Vernier scale.
- So, Vernier Constant of the instrument is ( 0.1 \ mm. ) .
- Number of small divisions of the Main scale through which the zero of the Vernier has moved from the zero of the Main scale is 48
- Thus value of Main scale reading is ( 48 \times 1 ) = 80 \ mm .
- Ninth division of the Vernier has coincided with a certain division of the Main scale.
Therefore, outside diameter of the job will be ( 48 + 9 \times VC ) = ( 48 + 9 \times 0.1 ) = 48.9 \ mm
READING – 3
From the reading of the measurement as shown in figure, we have following conclusions.

- ( 1 \ cm. ) of Main scale has 10 small divisions.
- 19 smallest divisions of Main scale coincides with 20 divisions of Vernier scale.
- So, Vernier Constant of the instrument is ( 0.05 \ mm. )
- Number of small divisions of the Main scale through which the zero of the Vernier has moved from the zero of the Main scale is 51
- Thus value of Main scale reading is ( 51 \times 1 ) = 51 \ mm .
- Fifteenth division of the Vernier has coincided with a certain division of the Main scale.
Therefore, outside diameter of the job will be ( 51 + 15 \times VC ) = ( 51 + 15 \times 0.05 ) = 51.75 \ mm .
Range of Vernier Caliper
Range of a Vernier Caliper is defined as the maximum and minimum sizes which the instrument can measure.
Vernier Calipers are specified by their range. These are available in sizes ranging from ( 0 \ to \ 25 \ mm ), \ ( 0 \ to \ 150 \ mm ), \ ( 0 \ to \ 200 \ mm ) and so on up to ( 0 \ to \ 2000 \ mm ) with accuracy of ( 0.1 \ mm ), \ ( 0.02 \ mm ), \ ( 0.05 \ mm ) and ( 0.001 \ inch ) .
Vernier Height Gauge

Vernier Height Gauge is used for measuring the heights, locating centre of holes, scribing of lines etc.
Construction of Vernier Height Gauge
The construction of a Vernier Height Gauge is shown in figure.
A Vernier Height Gauge consists of the following parts –
- BASE – A heavy base with an accurately finished bottom.
- VERTICAL BEAM – A vertical beam fixed at right angles to the plane of the base. This beam is graduated and acts as the main scale.
- SLIDER – A slider (or sliding head) with Vernier scale.
- SLIDER CLAMPING SCREW – Slider clamping screw for locking the slider with the beam at any desired position.
- FINE ADJUSTMENT SCREW – Fine adjustment clamp with a fine adjustment screw.
- SCRIBER – Scriber is fitted to the sliding jaw.
- VERNIER CLAMP – Vernier clamp moves with the slider and can be clamped at any desired position.
Principle of measurement and Vernier Constant of Vernier Height Gauge are similar to that of the Vernier Caliper.
Vernier Bevel Protractor
Vernier Bevel Protractor is a precise instrument used for measuring angles accurately up to 2 minutes ( 60 ) minutes = ( 1 \degree ) .
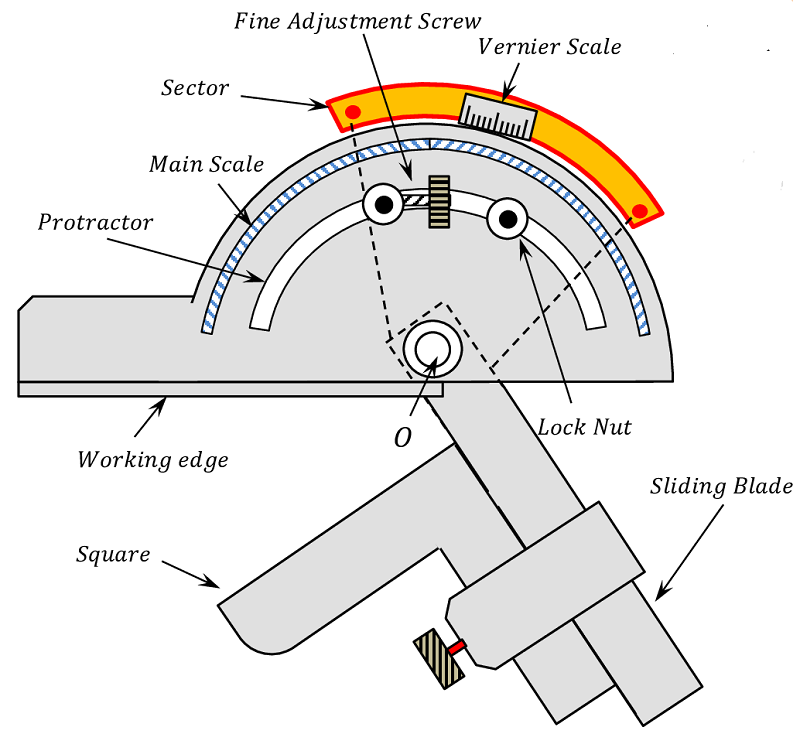
A Vernier Bevel Protractor is shown in figure.

The Vernier Bevel Protractor is consists of the following parts –
- PROTRACTOR – It is a semi-circular metallic piece which carries the main scale in degrees along its periphery. The graduations are from ( 0 \ to \ 90 \degree ) towards one end and ( 0 \ to \ 90 \degree ) towards the other. The ( 0 ) mark is at the centre of the protractor.
- EDGE BAR – An Edge Bar is fitted with the protractor which contacts with one edge of work piece.
- SECTOR & SLIDING BLADE – The Vernier scale is engraved on a Sector which is fitted to a Sliding Blade such that both the Sector and the Sliding Blade can turn together about a hinge ( 0 ) .
- FINE ADJUSTMENT SCREW – By means of a Fine adjustment Nut and Screw system, fine adjustment of the Sector and the Sliding Blade is possible.
- SQUARE – Angles from ( 0 \ to \ 90 \degree ) are measured with the help of Square and angles from ( 90 \ to \ 180 \degree ) are measured directly between the protractor and the Blade.
Vernier Constant of Protactor
Vernier Constant for protractor is find out as follows.
- Protractor has graduations along its periphery from ( 0 \ to \ 90 \degree ) towards one end and ( 0 \ to \ 90 \degree ) towards the other. The ( 0 ) mark is at the centre of the protractor.
- The Vernier of the instrument contains 30 equal angular divisions and 30 angular divisions on the Vernier coincide with 29 angular divisions of the Main scale.
- The value of smallest division of the main scale is 1 \degree .
- The value of 30 divisions on the Vernier is \left ( 29 \times 1 \right ) = 29 \degree .
- Therefore, the value of 1 division on the Vernier will be \left ( \frac {29}{30} \degree \right ) .
Hence, Vernier Constant for this instrument is \left ( 1 - \frac {29}{30} \right ) \degree = \left ( \frac {1}{30} \right ) \degree
Or, Vernier Constant = \left ( \frac {1}{30} \right ) \times 60 = 2 minute.
Therefore, with the help of a Vernier Bevel Protractor, accuracy up to 2 minutes is obtained for angular measurements.
For measurement of any angle between ( 0 \ to \ 90 \degree ) , the two sides of the job forming the angle are set along the Square and the Working edge of the Edge Bar. For measuring any angle between ( 90 \ to \ 180 \degree ) , these sides are set between the Sliding Blade and the Working edge of the Edge Bar.
A Vernier bevel protractor is also known as universal bevel protractor.
