What is a Micrometer?
A micrometer is an precision instrument used to measure the length or diameter of an object accurately up to 0.01 \ mm .
These measuring devices are made in many shapes and sizes depending upon the purpose for which they are to be used. These are –
- Outside Micrometer.
- Inside Micrometer.
Outside Micrometer
Outside micrometers are used to measure the outside diameter or length of an object.
Construction
An outside micrometer is consists of the following parts –
- Frame.
- Anvil.
- Spindle.
- Sleeve or Barrel.
- Thimble.
- Ratchet stop.
- Lock nut.
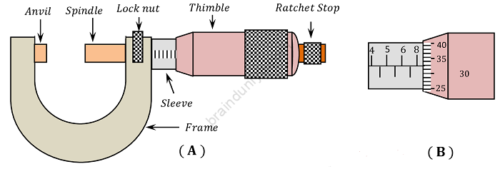
Frame
It is a semi-circular or rectangular piece of steel by which the instrument is held during taking measurement.
Anvil
It is a small piece of hardened steel fitted at one end of the Frame. The Anvil acts as a support for the measuring object whose one end touches with it during taking measurements.
Spindle
It is a steel rod almost having same diameter as that of Anvil. It is rigidly fixed to the Thimble at one end so that when the thimble is rotated, it rotates within the Sleeve or Barrel. Up to some length of the Spindle, threads are cut having ( 0.5 \ mm ) pitch. This threaded portion of spindle lies within the Sleeve and generally not visible from outside.
The object whose external diameter or length has to measure is held in between the Anvil and the Spindle face.
Sleeve or Barrel
It is a hollow piece of steel having internal threads up to some length which acts as a nut for the threaded Spindle. Its external surface contains linear graduations.
Thimble
This is a hollow cover rigidly fixed to the spindle. When the Thimble is rotated the spindle rotates. The beveled edge of the Thimble is divided into ( 50 ) equal circular divisions.
Ratchet Stop
This mechanism is attached to the Thimble at its end and is such that it automatically prevents the Spindle from pressing hard against the surface of the object being measured after the required feel has been attained.
This mechanism thus facilitates a uniform and accurate reading and prevents the job or the instrument from being distorted.
Lock Nut
This arrangement locks the spindle at any desired position.
After the correct feel has obtained by the Ratchet stop, the position of the Spindle is fixed by rotating the Lock nut. Then the object is removed from the space in between the Anvil and the spindle and reading is taken from the scales provided on the sleeve and the beveled edge of the Thimble.
Construction of an outside micrometer is shown in figure (A)

Principle of Measurement
The linear scale on the Sleeve or Barrel has two sets of graduations. One set of graduation is below the reference line and numbered and the another set is above the reference line as shown in figure (B).
The value of one smallest division on both sets of graduations is ( 1 \ mm ) . But each graduation on the bottom set is placed at the middle of the two consecutive graduations on the top set so that the effective value of one smallest division on the linear scale of the Sleeve is ( 0.5 \ mm ) . In the top set of graduations of this linear scale, the first and every fifth line is long and numbered 0, \ 5, \ 10, \ 15, \ 20, \ 25 and so on.
The pitch of screw thread on the spindle is ( 0.5 \ mm ) . So in one complete rotation of the spindle, it advances or retracted by ( 0.5 \ mm ) towards the Anvil or away from it depending upon the direction of rotation.
The circular scale on the beveled edge of the thimble is divided into ( 50 ) equal divisions. Every fifth division is numbered.
Range
Range is the minimum and maximum diameter or length which a micrometer can measure.
An outside micrometer is specified by its range. It is available in sizes ranging from ( 0 \ to \ 25 \ mm ), \ ( 25 \ to \ 50 \ mm ), \ ( 50 \ to \ 75 \ mm ) and so on ....... \ up \ to \ ( 575 \ to \ 600 \ mm ) increasing in steps of ( 25 \ mm ) .
In using this instrument over ( 0 \ to \ 25 \ mm ) , the initial gap between Anvil and Spindle is filled with extension rods of standard sizes provided with the instrument.
Thus different size of extension rods are used to increase the range. Size of the extension rod must be added with the reading obtained from such micrometer.
Least Count
Metric System Graduation
In metric graduation system, we have –
- One complete rotation of thimble = ( 0.5 \ mm ) advancement in linear scale of spindle.
- The circumference of thimble is graduated in ( 50 ) equal divisions.
Therefore, it can be said that ( 50 ) circular divisions on thimble = ( 0.50 \ mm ) on linear scale of spindle.
Hence, 1 circular division = \left ( \frac {0.5}{50} \right ) = \left ( 0.01 \ mm \right ) .
Hence, with the help of this Micrometer a measurement up to ( 0.01 \ mm ) is possible to be measure. This is called Least count.
English System Graduation
In English graduation system of a micrometer, ( 1 \ \text {inch} ) of sleeve is divided into ( 10 ) equal parts thus each measuring ( 0.1 \ \text {inch} ) . Each of these parts are sub divided into ( 4 ) equal parts.
Thus, the value of 1 smallest division on spindle is \left ( \frac {1}{4} \right ) = \left ( 0.025 \ \text {inch} \right ) .
Screw of the spindle has ( 40 ) threads in one inch. So pitch of thread is \left ( \frac {1}{40} \text {inch} \right ) = \left ( 0.025 \ \text {inch} \right ) .
The circular scale on the beveled edge of thimble is divided into ( 25 ) divisions.
Thus, we have –
- One complete rotation of thimble = ( 0.025 \ \text {inch} ) advancement in linear scale of spindle.
- The circumference of thimble is graduated in ( 25 ) equal divisions.
Therefore, it can be said that ( 25 ) circular divisions on thimble = ( 0.025 \ \text {inch} ) on linear scale of spindle.
Hence, 1 circular division = \left ( \frac { 0.025}{25} \right ) = \left ( 0.001 \ \text {inch} \right ) .
Hence, with the help of English Micrometer, measurement up to ( 0.001 \ \text {inch} ) is possible to be taken. This is called Least count.
Reading of Micrometer
Taking reading of a micrometer require some skill. Let us consider about following examples.

READING – 1
Consider about the reading of a micrometer as shown in figure – 1. From the reading we have following conclusions –
- Linear scale reading (top set reading) is 8 divisions.
- Linear scale reading (bottom set reading) is 0 division.
- Circular scale reading is 33 divisions.
Therefore, reading of the micrometer is –
- 8 \ mm (For linear scale reading of top graduation).
- 0 \ mm (For linear scale reading of bottom graduation).
- 33 \times 0.01 = 0.33 \ mm (For circular scale reading).
Therefore, exact dimension of the object will be ( 8 + 0 + 0.33 ) = 8.33 \ mm
READING – 2

Consider about the reading of a micrometer as shown in figure – 2. From the reading we have following conclusions –
- Linear scale reading (top set reading) is 14 divisions.
- Linear scale reading (bottom set reading) is 1 division.
- Circular scale reading is 22 divisions.
Therefore, reading of the micrometer is –
- 14 \ mm (For linear scale reading of top graduation).
- 1 \times 0.5 = 0.5 \ mm (For linear scale reading of bottom graduation).
- 22 \times 0.01 = 0.22 \ mm (For circular scale divisions).
Therefore, exact dimension of the object will be ( 14 + 0.5 + 0.22 ) = 14.72 \ mm
Precautions
When the face of the Spindle touches the face of the Anvil the "O" mark of the linear scale on the sleeve should coincide with the "O" line of the circular scale of the beveled edge of the Thimble. If such coincidence does not happen, it is to be understood that the instrument contains some error and the reading is to be adjusted.
Inside Micrometer
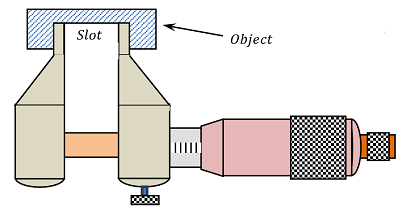
Some micrometers are made suitable to measure the inside diameter of a hole, width of slots and gaps etc. These are called inside micrometers.
The construction of an inside micrometer is similar to an outside micrometer. Only the legs are made slightly different so that it becomes capable to sit properly inside holes or slots as shown in figure.

Principle of measurement and least count of inside micrometer is similar to that of an outside micrometer.
Screw Thread Micrometer
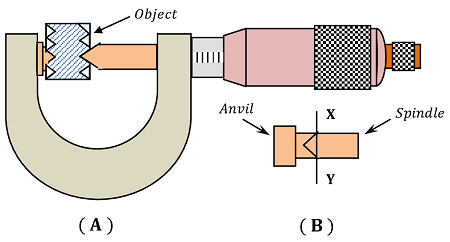
Screw thread micrometers are made to measure the pitch of a screw thread etc.
The construction of an screw thread micrometer is almost similar to an outside micrometer. The contacting end of Spindle is made conical and pointed and the face of Anvil is made V – shaped so that they become capable to adopt the measuring screw properly as shown in figure below.

Principle of measurement and least count of screw thread micrometer is similar to that of an outside micrometer.
Depth Micrometer

This micrometer is used to measure the depth of a hole, slot and recessed areas.
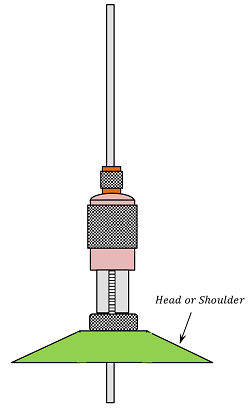
The construction of a depth micrometer is somewhat different than an outside micrometer due to its Head or Shoulder instead of Frame and Anvil as in outside micrometer. Remaining other parts are almost similar.
Therefore a depth micrometer is consists of the following parts.
- Head or Shoulder.
- Spindle.
- Sleeve or Barrel.
- Thimble.
- Ratchet stop.
- Lock nut.
SPECIAL FEATURES –
- HEAD OR SHOULDER – This acts as a reference surface and is held firmly and perpendicular to the length of the hole to be measure.
- In this micrometer Anvil is absent.
- The graduations on the outer surface of Sleeve are in reverse order i.e. from the head end graduations are 10, \ 9, \ 8 \ ..... etc. towards the ratchet end.
Remaining constructional features of depth micrometer are similar to an outside micrometer as shown in figure. Principle of measurement and least count of depth micrometer is similar to that of outside micrometer.
