What is called a Gauge or caliper?
Gauge and Caliper are inspection tools which are made for use without any scale or graduation mark.
- These are made of hardened steel and robust design and used for indirect measurement.
- Gauge and calipers are used for indirect measurement of quantities.
Gauge
A Gauge is made of two defined limits of diameter or length at two ends or edges. It is used for comparing gauge dimension with similar dimension of an object. These defined limits of a Gauge are called “Permissible Limit” and “Non-permissible Limit”. The maximum permissible limit is called “Upper Limit” and the minimum permissible limit is called “Lower Limit“. Thus, a gauge is used to find the accuracy limits of finished products.
Examples of Gauge are – Plug Gauge used for measuring hole diameters, Snap Gauge used for measuring wire diameters etc.
Caliper
A Caliper is adjustable and can be set at varying dimensions. It is a tool used for comparing similar dimensions of two different objects. Caliper is also used for marking of centre of a circle.
Examples of Calipers are – Outside Caliper used for comparing outside diameters, Inside Caliper used for comparing inside diameters, Hermaphrodite Caliper is used for marking centre of a circular object.
Use of Gauge & Caliper
Gauge and caliper have following uses –
- Gauge and caliper are used to check the dimensions of manufactured parts.
- These do not measure the actual value of the inspected dimension on the job. They can only be used for determining as to whether the inspected parts are made within the specified limits of dimension.
- Gauge and caliper are mostly used in industries for mass production to expedite the production process.
Following types of gauge and caliper are mostly used in industries.
Plug Gauge
Plug gauge is a cylindrical body divided into "GO" and "NOT \ GO" parts as shown in figure. A plug gauge is used to check the internal diameter of holes.
Application of Plug Gauge
Let, in production of a job, the internal diameter of a hole is allowed to vary from 2.75 \ cm to 2.76 \ cm . Then the "GO" end of the plug gauge is accurately made of diameter 2.75 \ cm and the "NOT \ GO" end is accurately made of diameter of 2.76 \ cm .

Now, if the finished internal diameter of the hole is within the given limits of 2.75 \ cm to 2.76 \ cm , the "GO" end of the gauge will go through the hole and the "NOT \ GO" end will not go through the hole.
On other hand, if the "GO" end does not enter the hole, it is to be understood that the internal diameter of the hole is less than 2.75 \ cm . Also if the "NOT \ GO" end enters the hole, it is to be understood that the internal diameter of the hole is greater than 2.76 \ cm . In both the cases, the job will be rejected.
The Plug gauge is made of high carbon steel.
Snap Gauge

A Snap gauge is a metallic flat plate divided into "GO" and "NOT \ GO" parts at its two ends as shown in figure.
It is used for checking the external diameter of shafts.
Application of Snap Gauge
Let, in a production, the external diameter of a shaft is allowed to vary from 5.75 \ cm to 5.76 \ cm . Then, the "GO" end of the gauge will be made of width exactly equal to 5.76 \ cm and the "NOT \ GO" end of the gauge will be made of width exactly equal to 5.75 \ cm .
Now, if the external diameter of the shaft is within the given limits of 5.75 \ cm to 5.76 \ cm , the shaft should pass through the "GO" end and should not pass through the "NOT \ GO" end.
If, on the other hand, the shaft does not pass through the "GO" end, it is to be understood that its external diameter is greater than 5.76 \ cm . Also if the shaft passes through the "NOT \ GO" end of the gauge, it is to be understood that the external diameter of the shaft is less than 5.75 \ cm . In both such cases the shaft is rejected.
Screw Pitch Gauge

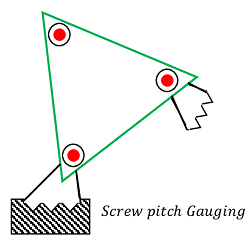
Screw pitch gauge is used in checking or measuring the profile i.e. shape and pitch of screw threads.
This gauge is consists of a high carbon steel holder containing a number of blades having different pitches cut accurately. The pitch of the respective blades are stamped on them. A set of gauge for measuring metric threads of pitches from 0.4 \ mm to 0.6 \ mm is having 20 blades.
Application of Screw Gauge
In checking the pitch of a screw thread, a screw gauge having the required pitch is used on the thread to be tested. Cutting of threads is continued till the profile of the gauge matches perfectly with that of the threads cut.
Radius & Fillet Gauge

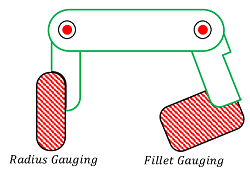
Radius and Fillet gauge is consists of a high carbon steel holder containing a number of blades having convex and concave shapes mounted at its two ends. The radii of curvatures of these blades are different and thus provide a fairly wide range of checking and measuring of radius.
Application of Radius & Fillet Gauge
This gauge is used for checking the radius of a fillet (i.e. concave shape of body) and radius edge (i.e. convex shape of bodies).
The blades carry stamped readings which indicates the value of radius of curvature of the respective blade of gauge. Each gauge consists of 16 radius gauges and 16 fillet gauges.
Feeler Gauge

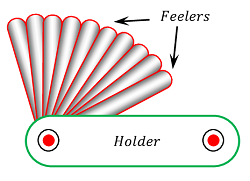
This gauge is used for checking and measuring the clearance between two mating parts.
It consists of a high carbon steel holder containing a number of steel blades having thicknesses ranging from 0.03 \ mm to 1.0 \ mm . The thickness of each blade is indicated by a number stamped on its face as shown in figure.
Application of Feeler Gauge
To determine the width of a gap i.e. clearance between two mating parts, one or more blades of feeler gauge are inserted and tried for a fit between the contacting surfaces until blades of suitable thickness are found.
According to IS specification, there are seven sets of feeler gauges 1, \ 2, \ 3, \ 4, \ 5, \ 6, \ 7 which differ from one another by the number of blades contained by them and by the range of thickness.
Plate Gauge

A Plate gauge is consists of high carbon steel circular plate having slots of different widths whose values are stamped at their ends.
This instrument is used to check and measure the thickness of metallic sheets. Sheets are allowed to pass into the slots one by one to check the thickness.
Sometimes, “gauge number” is engraved on the plate gauge near the respective slot which indicates the size of plate thickness.
Wire Gauge

The wire gauge is consists of a high carbon steel rectangular plate having holes of different diameters as shown in figure.
This gauge is used to check and measure the diameter of wires. Sometimes the “gauge number” is engraved on the wire gauge near the respective hole.
Caliper
Calipers are tools used to assist in indirect measurement of dimensions or comparison between them.
Calipers may be of three types –
- Outside Calipers.
- Inside Calipers.
- Hermaphrodite Caliper.
The construction of Outside and Inside calipers are shown in figure.

Outside Caliper
Outside Calipers are used to measure or compare the outside diameter of a round block or length or width or thickness of a particular job.
Figure (A) shows an Outside Caliper.
Inside Caliper
Inside Calipers are used to set internal dimensions or to transfer the same to work or check with standards.
Figure (B) shows an Inside Caliper.
Calipers may be ordinary caliper or spring loaded adjustable caliper. Figure (A) shows an ordinary Outside caliper and figure (B) shows a spring loaded adjustable Inside caliper.
Hermaphrodite Caliper
One leg of a hermaphrodite caliper has a straight pointed end and the other leg is bent inwardly at the tip as shown in figure.

Hermaphrodite Caliper is mostly used to determine the centre of a round bar or to scribe parallel lines to a straight edge.
Divider
A Divider is used for marking a job or measuring of distances between two points or dividing a given length in a definite ratio or drawing circles on a job.
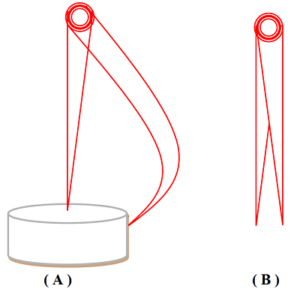
Figure (A) shows application of a Hermaphrodite Caliper and figure (B) shows a Divider.
